
In steaming milk, stretching involves adding air to create tiny bubbles, building microfoam, and is done at the start by gently introducing air while monitoring temperature. Texturing follows by immersing the wand deeper and swirling the milk to break down larger bubbles, refining it into a smooth, velvety foam. Mastering both phases guarantees your milk has a glossy, silky texture suitable for professional latte art. Keep going to discover detailed tips for perfecting each step.
Key Takeaways
- Stretching introduces air to create microbubbles, increasing milk volume and developing foam texture.
- Texturing involves swirling and heating milk to refine foam into a smooth, velvety microfoam.
- During stretching, control temperature around 100°F–110°F to prevent overheating and foam destabilization.
- Texturing raises milk temperature to 140°F–150°F, ensuring a glossy, dense microfoam.
- Both phases are essential for achieving professional, glossy microfoam and high-quality espresso drinks.
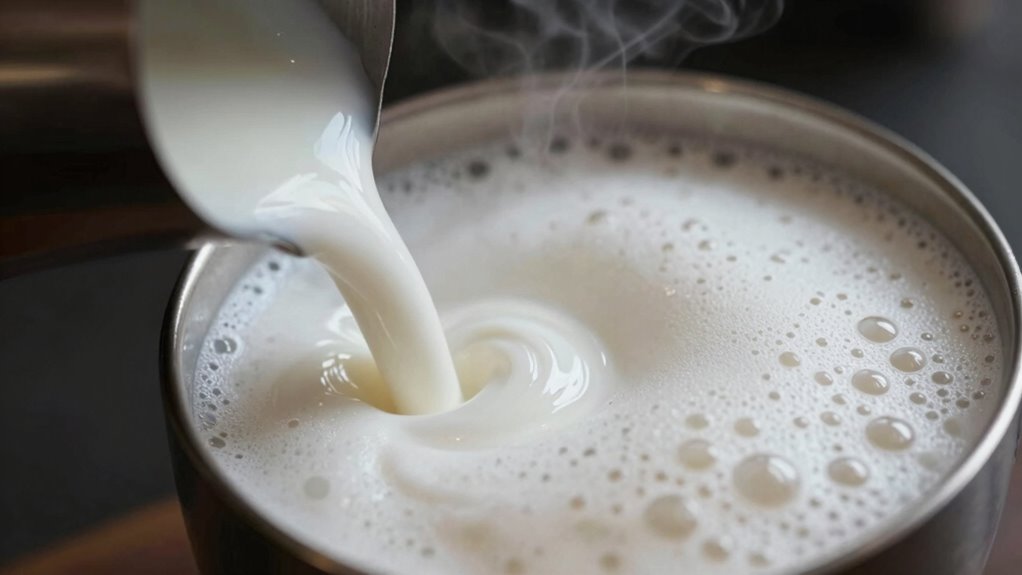
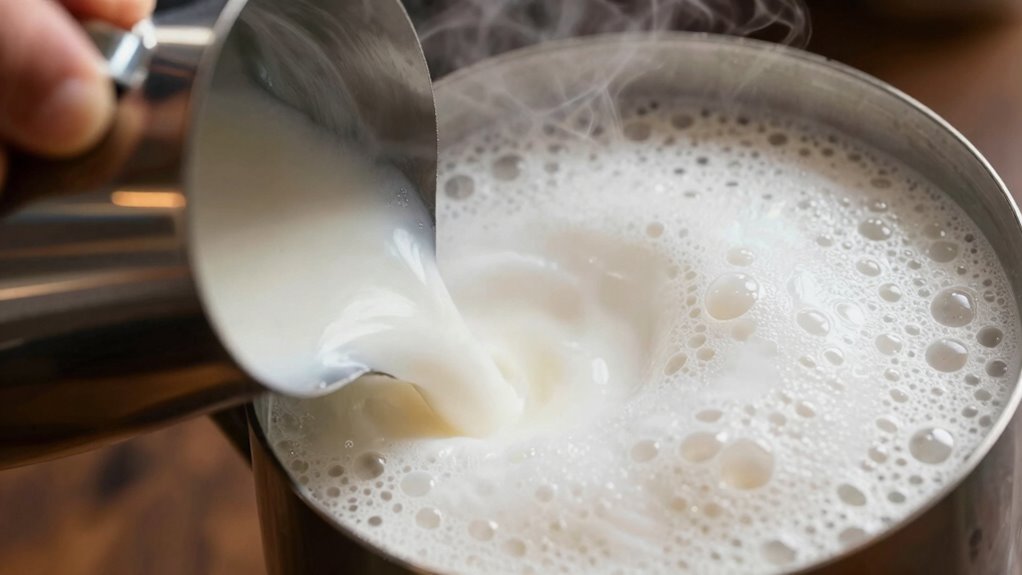
Have you ever wondered which method is better for enhancing the appearance of your surfaces: stretching or texturing? When it comes to steaming milk, understanding these two phases is key to creating the perfect cup. The first phase, stretching, involves adding air to the milk to develop foam, while the second, texturing, focuses on refining that foam into a smooth, velvety consistency. Your goal is to master both to achieve that glossy, microfoam look that elevates your espresso drinks.
During stretching, your primary focus should be on milk temperature and foam consistency. As you insert the steam wand into the milk, you need to introduce just enough air to create tiny bubbles without making the foam overly airy or bubbly. To do this effectively, you should listen for a gentle hissing sound and observe the milk rising slightly as air is incorporated. The milk temperature during this phase should stay around 100°F to 110°F, ensuring the foam develops without overheating the milk or compromising its quality. Too hot, and the milk loses its sweetness; too cold, and the foam remains stiff and unyielding. Achieving the right milk temperature is vital because it influences foam stability and texture, which are essential for a professional-looking pour. Additionally, understanding how contrast ratio impacts the visual quality of your foam can help you gauge the depth and richness of the microfoam you are creating.
Focus on milk temperature (100°F–110°F) and gentle air introduction for perfect foam during stretching.
Once you’ve added enough air and the milk reaches the desired temperature, you move into the texturing phase. Here, your aim is to create a smooth, glossy foam with a consistent microbubble structure. This involves immersing the steam wand deeper into the milk and swirling the pitcher to break down larger bubbles and incorporate the foam evenly. As you do this, you need to adjust the steam power slightly to maintain a gentle whirlpool motion, which helps emulsify the foam into a silky, velvety texture. The foam should be dense, shiny, and free of large bubbles, with a creamy feel when you swirl the pitcher. Remember, the milk temperature during texturing should be around 140°F to 150°F—hot enough to produce a stable foam but not so hot that it scorches or destroys the delicate proteins responsible for foam stability.
In essence, mastering both stretching and texturing phases requires attention to milk temperature and foam consistency. Stretching sets the stage by creating the right amount of air and initial foam, while texturing refines that foam into a smooth, uniform microfoam. When you perfect these techniques, your milk will not only look better but also taste richer, creating a balanced, professional-quality espresso experience every time.

Milk Frothing Pitcher 350ml/600ml/900ml/1500ml (12oz/20oz/32oz/50oz) Steaming Pitchers Stainless Steel Milk/Coffee/Cappuccino/Latte Art Barista Steam Pitchers Milk Jug Cup with Art Pen,12oz
Perfect Combination Of Milk Frothing Pitcher And Latte Art Pen: The milk frother jug can be used in…
As an affiliate, we earn on qualifying purchases.
As an affiliate, we earn on qualifying purchases.
Frequently Asked Questions
What Tools Are Best for Stretching and Texturing Milk?
You’ll want a good, stainless steel frothing pitcher for milk frothing, as it helps you control the steaming techniques effectively. A thermometer is also useful to monitor temperature precisely during steaming. For the best results in stretching and texturing milk, use a steam wand attached to your espresso machine, which allows you to incorporate air and create smooth, velvety microfoam. Practice with these tools to master your milk frothing process.
How Can I Tell if My Milk Is Properly Textured?
Imagine a smooth, silken river flowing in your cup—that’s how your milk should feel. When properly textured, the foam has a glossy, velvety consistency, with tiny, uniform bubbles. You’ll notice the milk reaches around 150°F, feeling warm but not hot. If the foam is too stiff or too thin, or if the temperature’s off, it’s a sign you need to adjust your technique for perfect milk texture.
Can I Texture Milk With a Home Espresso Machine?
Yes, you can texture milk with a home espresso machine. Use the steam wand for milk frothing and espresso steaming, positioning it just below the surface of the milk. Start with a gentle swirl to create microfoam, then submerge the wand deeper to heat the milk evenly. With practice, you’ll master milk frothing techniques to achieve creamy, well-textured milk perfect for your espresso drinks.
How Does Milk Fat Content Affect Stretching and Texturing?
Think of your milk as a canvas—its fat content shapes the masterpiece. Higher milk fat makes your milk creamier and easier to stretch, creating silky, velvety textures. Lower fat milk, like skim, is more fluid and harder to achieve that smooth microfoam. So, when you choose milk with the right fat content, you control the consistency and texture, turning your steaming process into an artful dance.
Are There Health Considerations When Steaming Different Types of Milk?
When steaming different types of milk, you should consider health factors like dairy allergies, which make cow’s milk unsuitable for some. Plant-based milks, such as almond or soy, can be good alternatives, but check for added sugars or thickeners. Always guarantee proper steaming techniques to avoid bacterial growth, and be mindful of any sensitivities. If unsure, consult with a healthcare professional about the safest options for your dietary needs.

COLDFILL 21.16oz/600ml Milk Frother, 8-in-1 Automatic Milk Frother and Steamer, Electric Hot & Cold Foam Maker, Ergonomic Grip Stainless Steel Detachable Frother for Coffee, Latte, Cappuccino
【8-in-1 Milk Frother for Coffee & Hot Chocolate】This 8-in-1 electric milk frother for coffee and hot chocolate creates…
As an affiliate, we earn on qualifying purchases.
As an affiliate, we earn on qualifying purchases.
Conclusion
So, when you master stretching and texturing, you’re not just making milk—you’re transforming it into a silky, cloud-like masterpiece that could make even the grumpiest barista smile. Get these two phases right, and you’ll be wielding the power to turn simple milk into a velvety wonder that elevates every cup to legendary status. Trust me, once you nail it, your latte game will be so amazing, people will think you’ve got a secret coffee wizardry up your sleeve!
Milk Frothing Pitcher 350ml/600ml/900ml/1500ml (12oz/20oz/32oz/50oz) Steaming Pitchers Stainless Steel Milk/Coffee/Cappuccino/Latte Art Barista Steam Pitchers Milk Jug Cup with Art Pen,12oz
Perfect Combination Of Milk Frothing Pitcher And Latte Art Pen: The milk frother jug can be used in…
As an affiliate, we earn on qualifying purchases.
As an affiliate, we earn on qualifying purchases.

Subminimal NanoFoamer Lithium Performance Milk Foamer | USB-C Rechargeable, IP4 Waterproof, Dual-Speed, Stainless Steel | Premium Microfoamed Milk in 30 Seconds, Barista-Style Coffee Drinks at Home
High-Performance Power : Cafe-quality microfoamed milk is now possible with a handheld tool! No need for a costly…
As an affiliate, we earn on qualifying purchases.
As an affiliate, we earn on qualifying purchases.